CI-HPC Documentation & Installation
Installation process is not that simple, so sadly you won’t find here something like this:
./configure && make && make install
Perhaps in the future version, installation will be easier… but if you know, what you are doing, you can setup your project within 15 minutes.
In order to install CI-HPC framework, please understand its structure first:
 jenkins
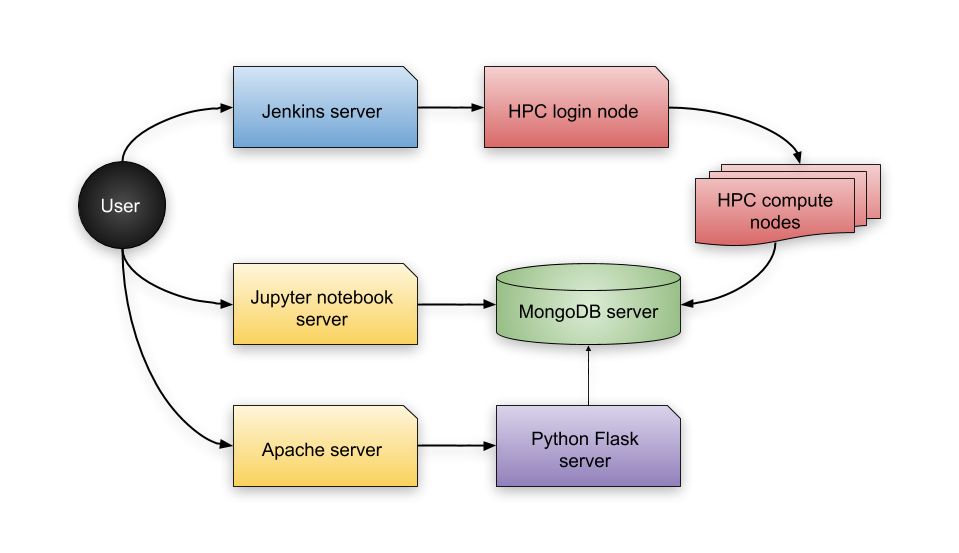
From the illustration above, you can see there are several servers.
- With BLUE color is a Jenkins server. This server is in charge of git repository checking. If Jenkins detects any change in repository, it will contact an HPC login node to starts off the installion and testing of your project.
- HPC system (in a RED color)
consist of 2 parts:
- The login node will translates what is Jenkins trying to do and will prepare a PBS job, that will install your project and after that run your benchmark for your project.
- The compute nodes, that will take care of the installation and testing and when they are done, they will store the results to a database.
- The database server (in a GREEN color) has a MongoDB database running and stores and loads benchmark results.
- You have 2 options when it comes to visualising your results
(both options are marked with YELLOW color):
- The first option (slightly easier but not by much) is (probably soon to be deprecated Jupyter Notebook server. This solution offers great customization but requires knowledge about Python and some python’s scientific packages.
- The seconds option, interactive website, offers more interactivity and better visualisation.
Thanks to
highchartsjs framework, you have plenty of options for your charts. You can zoom in thre results, filter the series or simply (by clicking) go to the commit, which you are interested in.
- Along interactive website, you need to have additional server running
(the data need to get to the web page somehow), and this is why there
is this last server (in PURPLE color).
It has a
python flaskserver running, which is serving the data from the database back to the website.
Prerequisites
Before configuring anything, make sure you have:
an access to the HPC node (login preferable via
SSH Key-Based Authentication).an access to a CI server such as Jenkins or other similar tool. If you have no such server available,
CRONmay suffice.an access to the database server, for now only MongoDB is supported. You can get free hosting on MongoDB Atlas for up to 500MB.
an access to a jupyter notebook server for visualisation. For education purposes Azure notebooks is possible option.
or
access to a web server and access to a flask server. Flask server can be isntalled easily via
pippackaging tool.
Note: Jenkins server, Database server and visualisation servers can be running on single computer.